The check-in system is the first impression that sticks, which is why it deserves a lot of attention.
A common problem at most events is people waiting in line! This situation ends up causing dissatisfaction among participants and gives the impression that the organizing committee is disorganized.
We know it’s extremely important to choose a check-in system that fits the size of your event. With that in mind, we put together five check-in tips that will make your event a success.
1. Choosing the Location
You don’t want people judging your event before it even starts, so choose a well laid-out space for check-in.
Be careful when choosing it — the bigger and more spacious, the better. For small events, it’s easier to find a suitable spot.
For large events, the more people you expect, the greater the venue’s influence on participants’ perception.
Prefer open, airy spaces, and avoid closed rooms, since many people feel uncomfortable in tight, crowded, enclosed spaces.
2. Prepare Your Team
It’s important to have enough staff to make sure lines don’t become a problem. The number of people on your team should be proportional to the number of participants you expect.
To figure out the exact number, just run a simulation:
- Define how many people will work on check-in
- Simulate how long it takes to check in a single participant
Then just apply this formula:
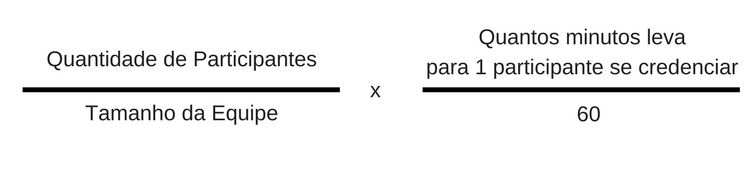
If 1 person can be checked in every 3 minutes, and you have 1,000 registered participants with a team of 10 people checking them in, the check-in process would take 5 hours!
When in doubt, it’s better to have too many people on the team than to leave participants waiting in a long line. Remember, this is a professional event, not a line for an amusement park.
3. Post Clear Signage
It might seem obvious to you where the check-in area is, but nothing is worse for a participant than feeling lost, not knowing where to go.
Use plenty of signage — it doesn’t need to be elaborate, just print arrows and directions on paper to guide people. Even if your event has a single entrance, make that very clear with signage.
Assume your participants have never been there before and might not even know a check-in area exists! Signposting and guiding participants in the right direction is extremely important.
4. Split Up the Lines
Create separate lines when needed. You can use several lines — one for participants registering on the spot, another for those with payment issues, another to pick up materials and badges.
These different lines help keep your check-in process moving and organized.
If the event is very large and lines are long, put staff in place to greet and reassure participants, guiding people, providing information, and answering questions.
A very long line can create an unpleasant atmosphere.
5. Use Technology to Your Advantage — Use a Check-in System!
Check-in apps are a great solution to speed up and streamline this process! They speed up entry and make it easier to look up data, reducing lines and staffing needs.
Even3 offers an app that lets you run the entire check-in system straight from smartphones. It’s already available on the App Store and Play Store. With it, you can even check people in without an internet connection! Offline check-in is possible, and everything syncs after the event.
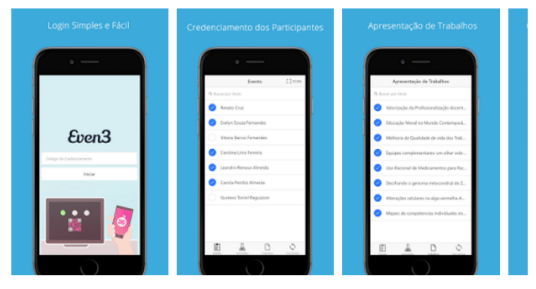
It also helps save time and money by printing the attendance list, eliminating the need for QR code readers that aren’t very fast or well integrated.
It’s intuitive and has great interaction design, so you won’t have trouble using it — just generate your code in the check-in area under the Options menu.