Streaming an online event can happen either through pre-recorded videos or live, using Zoom Meetings.
But regardless of how you stream it, the recording process is the crucial stage of this kind of event. Agree?
You need to make sure there are no technical issues and that the sound and image quality meet expectations. After all, the content needs to come across as well as possible.
For that, Zoom Meetings is one of the best-suited platforms, whether for simple talks and webinars, or for larger online events with simultaneous activities.
What is Zoom Meetings?
Zoom Meeting is a great tool for holding videoconferences, used to virtually meet with other people or even to stream online events by video, audio only, or both.
It can be used with just one person presenting, or even with several speakers participating, in larger online events, for example.
The platform allows for more humanized contact between organizer and attendees, through chat for real-time communication or even through video during live chats.
This way, with just a few steps, you can create your own meeting and, right after, make the access link available to attendees in your event, pretty cool, right?
Advantages of using Zoom Meetings
One of Zoom’s biggest strengths is the interaction the speaker can have with attendees during the online stream through chat.
Besides that, the tool lets you share educational materials from your computer so your audience has access to them, an important detail for online events like courses, webinars, and talks.
After all, it’s very important for attendees to have access to the slides presented or materials that help them better understand the topic covered, whether during the stream or after it ends.
The tool also lets the speaker mirror their computer screen so the audience can see slides, for example.
And, still, attendees can be split into groups during the videoconference, a crucial detail for online events with simultaneous activities.
Another plus is that you can use Zoom for free! That’s right! The tool has a free version for those who usually run smaller online events, like a single talk, for example.
For the free plan, only up to 100 people are allowed in the meeting, and it can only run for up to 40 minutes.
So, it’s very important to limit the number of registrations available for that activity.
How to create a Zoom Meetings account?
If you want to stream your online event through Zoom, the first step is creating an account.
After accessing Zoom Meetings’ homepage, just click “Sign up, it’s free!” and register your email, preferably the one you use most for your online events.

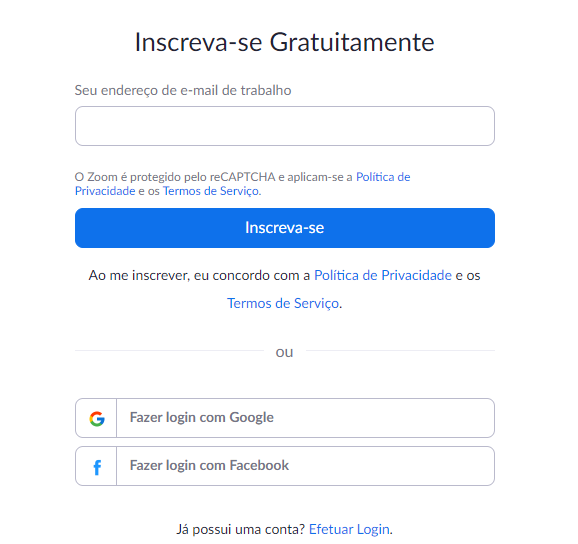
Then, check your inbox and open Zoom’s confirmation email and click confirm.
Remember to finish setting up your account with the details requested by the tool and select a plan that fits your online event’s needs.
For example, the free plan allows videos with up to 2 people to be recorded with no restrictions, but videoconferences with three or more participants have a 40-minute limit. In this case, you need to figure out whether that works for your kind of online event.
Done! Your account has been created, now you just need to log in.
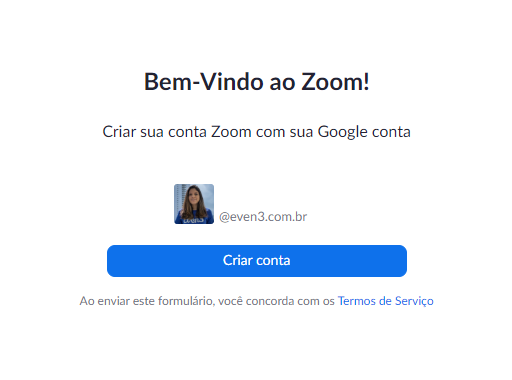
Logging into Zoom Meetings is quick and easy, you can either register on the site or use your Facebook or Google account.
By logging in with one of those two networks (Facebook or Google), your information will automatically be sent to the tool and you won’t need to spend much time on a new registration.
Now that your account is all set, it’s time to start using Zoom’s features!
You’ll be able to hold a meeting, in this case, your online event, with three options: video on, video off, or screen sharing only.
Now, let’s get to it!
How to stream online using Zoom
Starting a videoconference
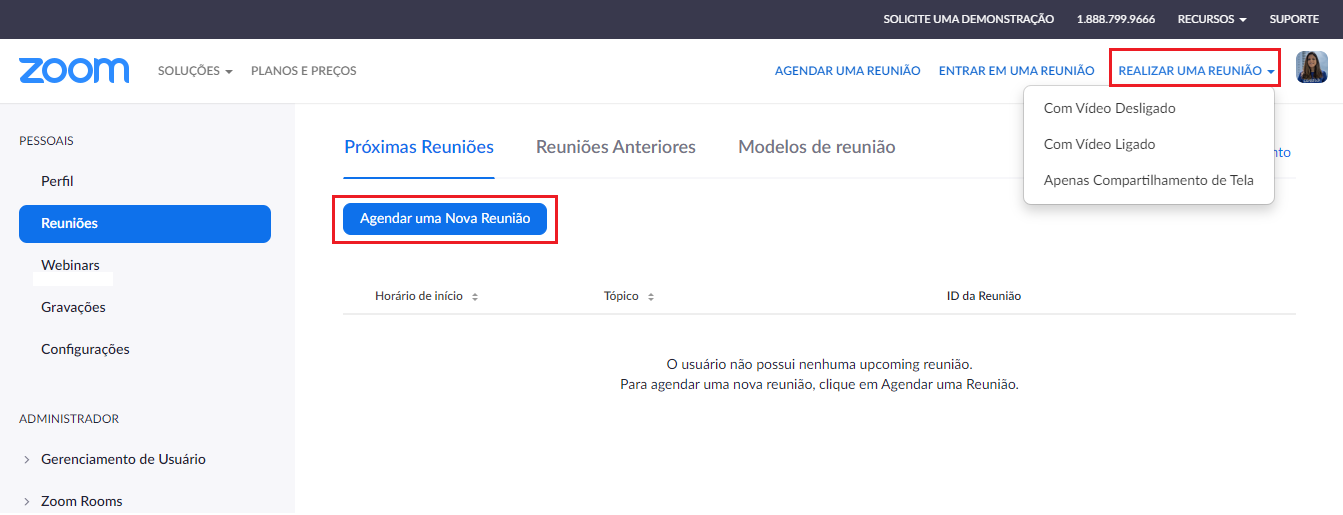
This step seems the hardest, but it’s actually quite simple! On the home page, click “Host a Meeting” and choose the format you want: video on, video off, or screen sharing only.
The “With Video On” option is ideal for a webinar that works like an interview or conversation between guests. Recordings “With Video Off” are interesting when only the audio content matters to attendees.
And the “Screen Share Only” format works when you’ve prepared a slide presentation with figures and text to be displayed.
But, if you want to share your screen while recording the webinar in any presentation format, just click “Share Screen” and select what you want to share (e.g., the whole desktop, a presentation, just one page).
Inviting people
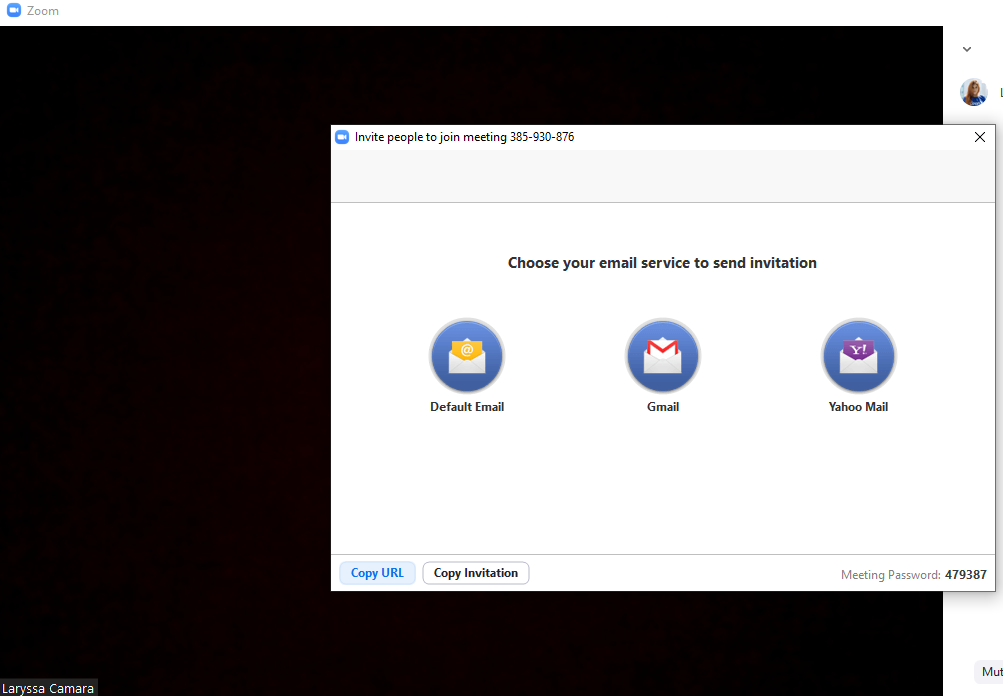
To invite people, in your meeting area, click the “Invite” icon and choose whether the invite will be sent by email, SMS, or social media. You can also copy the meeting link and send it however you’d like.
Streaming the online event
Before starting the live stream, it’s important to check that everything is okay so there are no surprises during the event. So I suggest always testing the host’s and guests’ audio, plus screen sharing for visual presentations, before the event starts.
#Even3Tip: Do a test recording with all speakers to check that everything is working normally and that everyone can safely use the platform.
All set? Now just click the “Record” icon and start the videoconference. To finish, select “Stop,” close the video page, and the platform will automatically download an .mp4 file to your computer.
Zoom Meetings for webinars
The most interesting thing about Zoom is that it has a feature built specifically for recording webinars, Zoom Video Webinar. With it, you can stream video in real time or do lives.
The platform offers a free plan with some restrictions, the Webinar feature, for example, is only available on Zoom’s Pro version.
Still, nothing stops you from using it for free with a simpler kind of online event!
Zoom’s video webinars let you run large online events with video, audio, and screen sharing with up to 100 video participants and 10,000 attendees, starting at $40/month/host.
The Webinar feature can be added to any paid plan, like Pro, Business, or Education.
On the Pro version, besides the free plan’s basic features, the number of participants and meeting duration increase. To learn more about the plans, click here.
#BonusTip
If you want to hold a paid online event, you need to plan ahead for ticket sales, as well as the estimated maximum number of people.
Now you might be wondering… how do I sell registrations for my online event? It’s quite simple!
In this case, the best approach is to go with a platform specialized in event management and organization, one that allows registration sales, attendee flow control, and everything that fits your event’s needs.
With the Even3 platform, you can stream an online event through Zoom Meetings and manage every stage of your event, like: registrations, certificates, attendee control, and even have your own website.
Now, we’ll show you how simple it is to stream online events on Even3 using Zoom Meetings, and also manage your event’s registration sales!
How to stream an online event on Even3 using Zoom Meetings: full step-by-step
If you created an online event on the Even3 platform and want to use Zoom as the tool to stream your event, it’s quite simple!
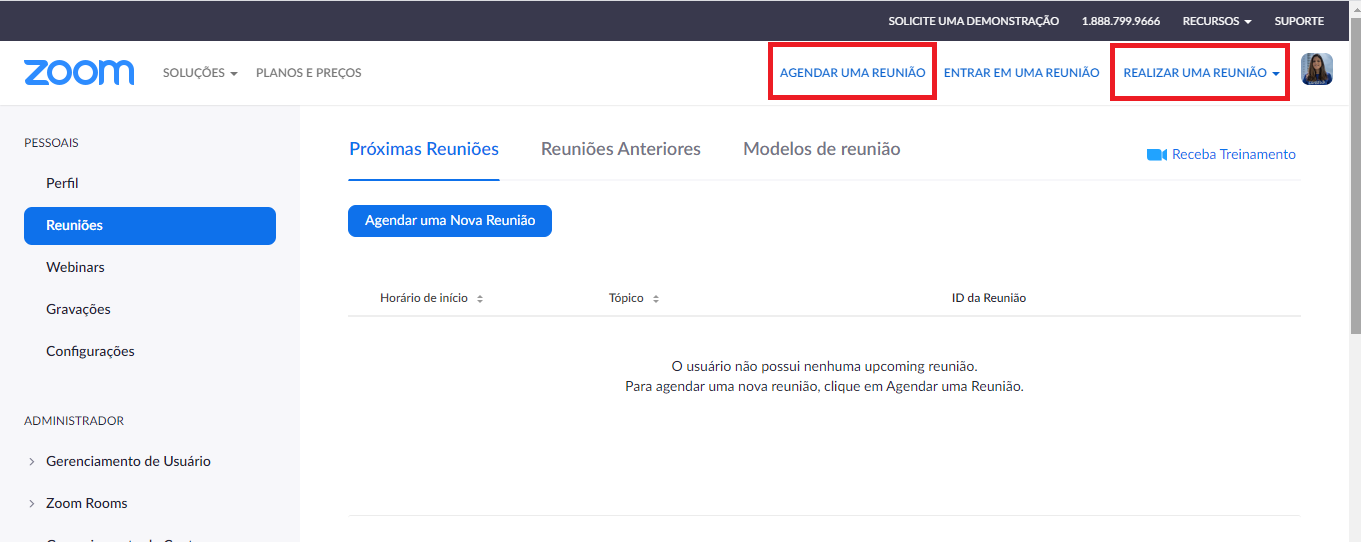
First, log into Zoom, then, on the home screen, there are two initial options: Schedule a meeting or Host a meeting.
In short, by scheduling a meeting, you generate the room link ahead of time, where the online event will happen. This is handy since you can already add that link to the event’s Schedule.
If you’d rather not, you can also create that virtual environment and, as a result, generate that link only at the time of the event. That option is what they call hosting a meeting.
Let’s go over both options in detail so you can confidently choose the one that fits you best at this moment.
Scheduling a meeting
If you prefer to have everything ready for your event ahead of time, this option was made for you.
By choosing “Schedule a meeting” you can set essential details, like the event title, date and time, and also whether attendees will need an access password and whether they can join with or without their microphone on.
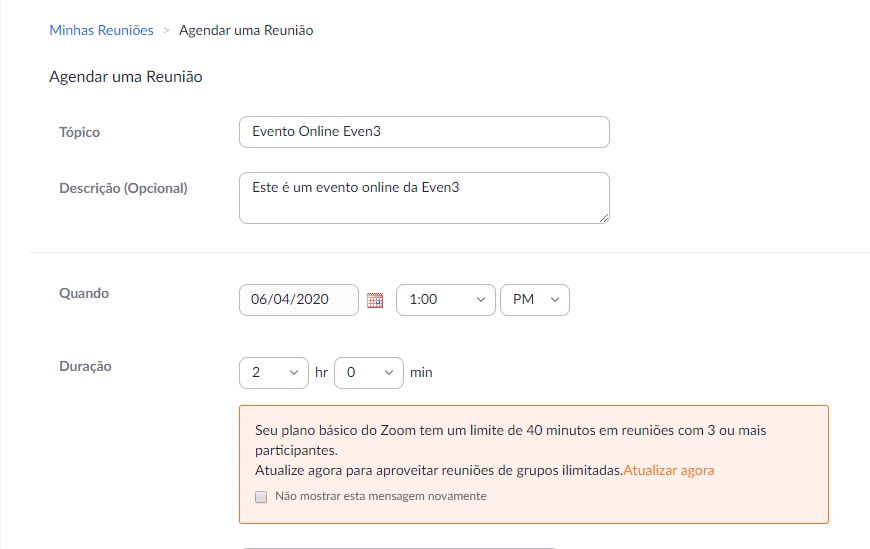
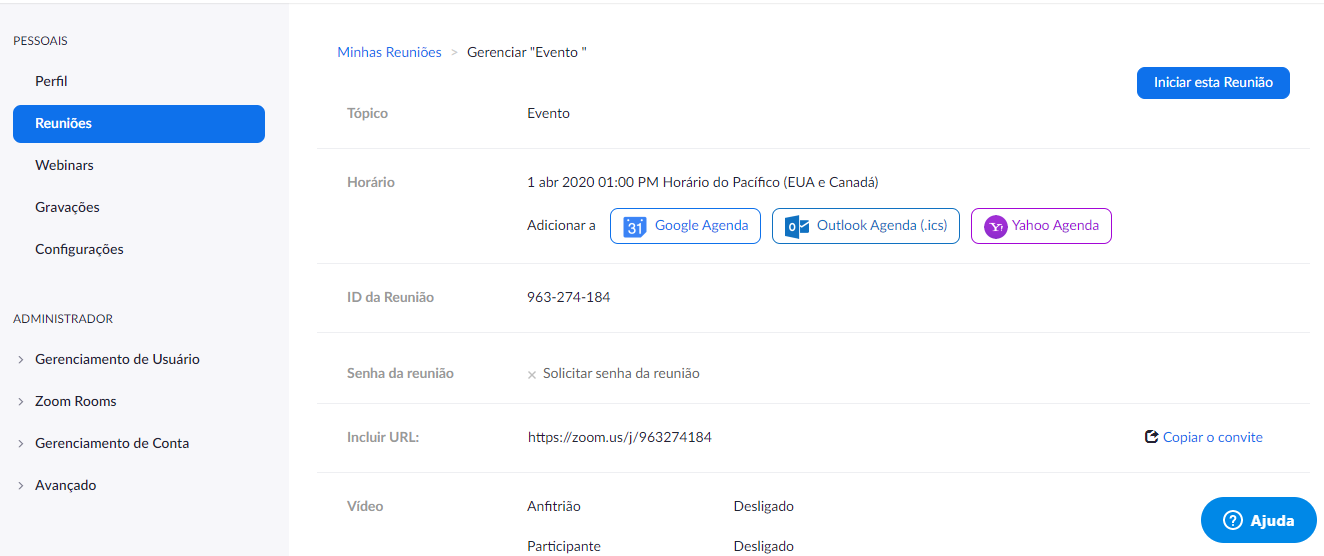
Once you’re done filling everything out and save all the details, the settings will already be available on Zoom.
And, right after, you’ll get a URL, that is, a link to add to your event on Even3. You get that link under “Copy Invitation“.
Hosting a meeting
This is the option if you don’t have time to get everything ready ahead of time. But don’t worry! With this option you’ll only need a few steps and, right after, you’ll have the link to add to your event.
Let me explain how it works in more detail.
Under “Host a meeting” you’ll find the options: With Video On, With Video Off, and Screen Share Only.
This is the moment you choose which format your event’s presentation will run in.
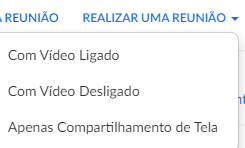
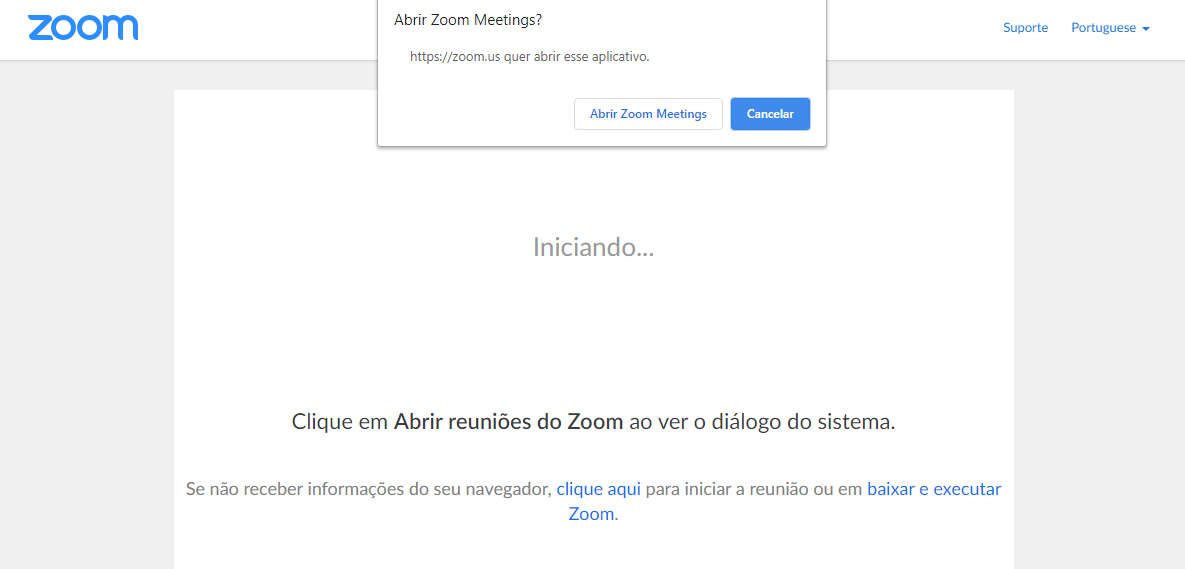
Once you choose the best option for your presentation, you’ll be taken to the screen below.
Just select “Open Zoom Meetings” and you’ll be automatically taken to your meeting.
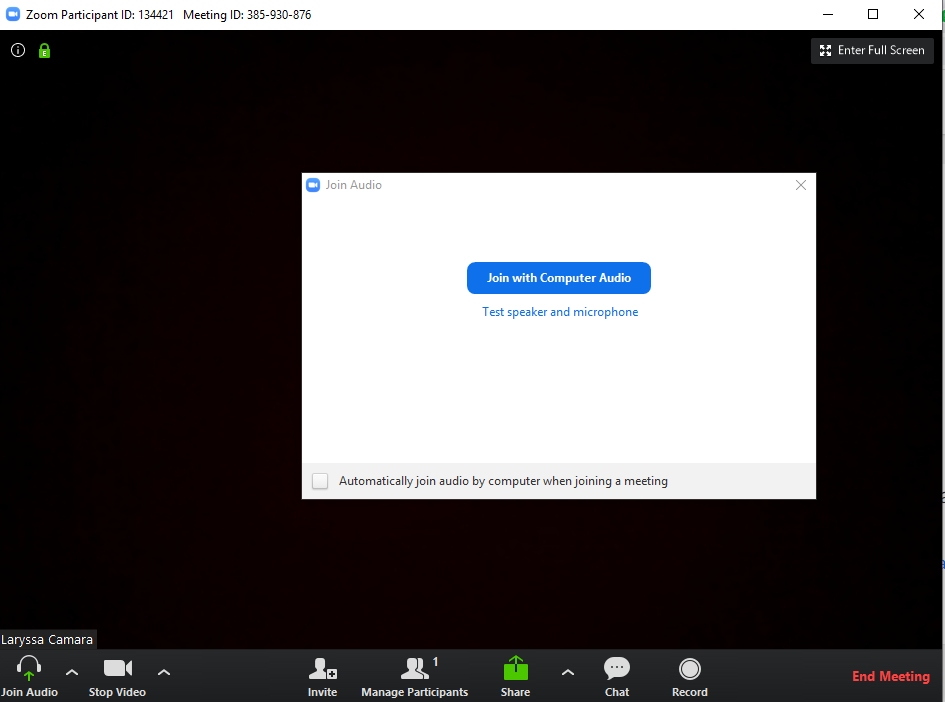
After that, just finish your audio settings and you’re done!
From here on, you’re almost all set to start your event. Your room is already open and you can already see the meeting, its ID, and all the features like chat, recording, and participants.
Oh! And most importantly, get the link to make available to attendees.
Copying the URL
To copy your event’s URL, just click “Invite” at the bottom of the screen and select “Copy Invite Link“.
The URL is the link that lets your attendees access the meeting you created to hold your event.
And now that you have this URL, let’s insert it directly into your event’s streaming menu on Even3.
Adding the Zoom Meetings link to your online event on the Even3 platform
When you access your event on the Even3 platform, first, you need to go to your event’s settings and enable the “online event” option. And, automatically, a new menu will appear on your event called Online Streaming.
Go to the Online Streaming menu to add the link copied from Zoom Meetings under the “Other” option, as shown in the image below:
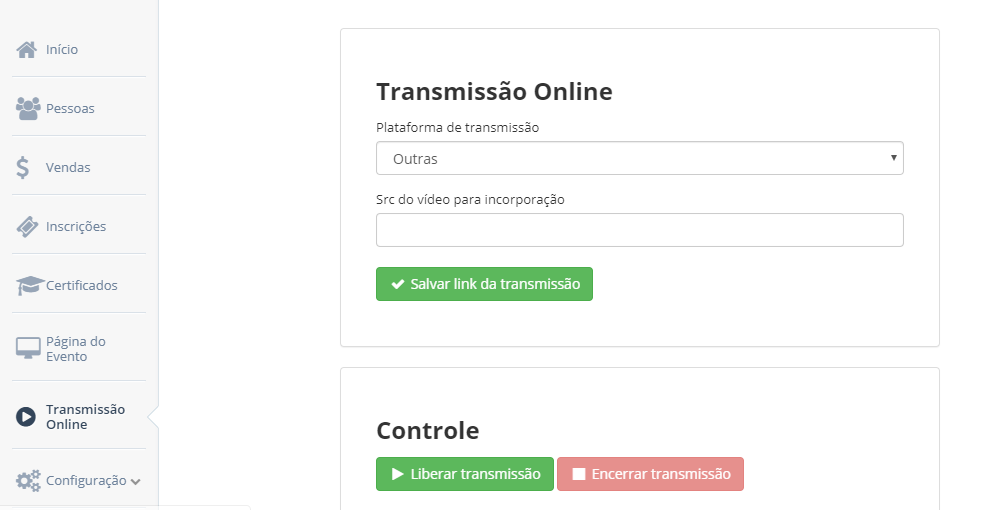
Once done, just click “Save Streaming Link.” Pretty simple, right?
And, if your event is about to happen or you’re already interested in making access available to attendees, just click “Enable Streaming.”
To close out the event, just click “End Streaming” and attendees will no longer be able to view it. Very simple!
Even3 is a complete platform to help you manage your event, whether in-person or online, we’re with you from receiving registrations all the way to issuing certificates.
Don’t waste time, start organizing your online event now!