
“First impressions are what stick” certainly applies to event accreditation. Have you thought about that?
After all, it defines how your attendees will be received: with long lines and stress, or with calm and speed.
Since accreditation is one of the first points of contact with attendees, doing it well makes a real difference.
To help, you can rely on a few best practices and technology tools. Learn more about:
- What is accreditation for events?
- How to set up accreditation for an event?
- 5 tips to make your accreditation faster
What Is Accreditation for Events?
At events, accreditation is the validation of an attendee’s ticket and the confirmation of their presence at the venue. It’s the first step of any in-person event.
At this stage, entry is controlled to make sure only authorized people come in. In some cases, it also includes handing out support materials and welcome gifts.
Accreditation is also connected to certificates: it’s what proves attendance at the event and allows the attendee to receive their certificate.
How to Set Up Accreditation for an Event
1. Plan Ahead
Planning your accreditation process should start as soon as the event date is confirmed. You’ll need to define the accreditation method (online, in-person, hybrid) and the platform you’ll use.
On event day, pay attention to a few essentials. Follow this checklist:
- Test and set up the internet connection at the venue
- Prepare and assemble kits for attendees
- Set up the check-in booths
- Install and organize essential equipment: laptops, attendee lists, and label printers
2. Train Your Team
Having a dedicated accreditation team is essential to validate attendee entries quickly.
Set aside a team just for this task and make sure everyone knows how to use the tools needed for check-in.
Also, build a team that’s able to solve problems and guide attendees through the first steps.
3. Create Different Check-in Points
Set up multiple check-in points to avoid crowding. Make sure they’re clearly signposted and accessible.
4. Assign Someone to Hand Out Kits
As mentioned, it’s important to keep attendee kits and gifts organized beforehand. The same goes for support materials.
It also helps to split these tasks among your check-in team, so one person handles accreditation and another hands out the kits.
That way, lines will move faster and attendees will get through more quickly.
5. Use a Check-in System
Have you seen the technologies that let you validate attendee tickets through mobile apps?
They scan the QR codes on tickets and complete check-in in as little as 5 seconds.
/blog.even3.com.br/wp-content/uploads/2017/05/2-credenciando-os-participantes-no-aplicativo-even3.gif)
These solutions are known as check-in apps and are usually tied to an event management system that offers several features to make this stage faster and easier to organize.
For example, Even3’s system offers a check-in app along with other features, such as:
- Tracking whether kits and support materials were delivered
- Monitoring how many attendees are present on event day
- Check-in for individual activities
That way, you won’t need to keep any manual records on event day.
6. Prepare for Offline Check-in
Besides the usual features, a good event system can also offer the advantage of offline check-in.
This protects you from common mishaps, like power outages, internet issues, or a laptop freezing.
In practice, an app like Even3’s reads the ticket’s QR code even without an internet connection, saves the information, and syncs it once the connection is back.
/blog.even3.com.br/wp-content/uploads/2017/05/credenciamento-aplicativo-even3-sincronizar-dados.gif)
That way, you’ll finally have accreditation that’s secure, fast, and hassle-free!
5 Tips to Make Your Accreditation Faster
1. Use Badges During Check-in
Using badges is one of the most important points for making your accreditation faster.
That’s because they usually carry labels with attendees’ registration QR codes, making them easy to scan and validate.

Badges are also an important identification tool and help control access, making sure only attendees enter certain areas of the event.
On top of that, different badge colors can help easily tell attendees, speakers, and staff apart.
If you’d like, you can also include relevant information, such as name, company, and job title.
That way, badges will also encourage networking and interaction.
2. Divide Check-in by Groups
As mentioned, it’s a good idea to set up different check-in points at your event.
But to avoid everyone heading to the same spot, it’s better to split attendees into groups.
For example, you could separate people by the first letter of their name (e.g., A-G, H-N), ticket category (e.g., General, Student, VIP area), and so on.
What matters is communicating this setup to attendees ahead of time. Be sure to let them know where they should check in at the venue.
3. Assign Someone to Manage the Lines
To avoid headaches, you can create a line manager role on your check-in team.
That team member will guide attendees through the line, explain which documents they need to have on hand, and point out where to enter.
Overall, it’s support to speed up and direct the check-in process.
4. Set Aside a Space for New Registrations
Some events allow attendees to register on the spot.
If that’s the case for your event, it’s best to set aside a specific space to handle new sign-ups and register new attendees.
That way, you avoid longer lines and make sure everyone has a great experience at the event.
5. Use Self-Check-in Kiosks
Finally, you can make your accreditation even faster with self-check-in.
This system lets attendees check in quickly and independently, without facing long lines.
In practice, self-check-in works like this:
Tablets or computers are logged into self-check-in screens, like the one below:

These screens are available through any check-in system that offers self-check-in, such as Even3’s.
The devices are then placed at the event entrances, working as kiosks for attendee self-check-in.

This way, you can even reduce the number of people needed on your check-in team while making sure attendees have a great experience at the event.
Accreditation for Online Events: How Does It Work?
The tips above work great for in-person or hybrid events.
But what if your event is online?
In these cases, accreditation is even more important for tracking who actually attended the content and is eligible to receive a certificate.
These days, you can rely on a few options for virtual accreditation. They are:
Accreditation via Form
The most popular method is using forms, like Google Forms or Survey Monkey.
Attendees fill in their details during the broadcast and receive their certificates.
While it seems simple, this method is extremely manual.
It requires organizers to create the online form, check each attendee’s information, and send certificates individually to the emails provided.
Accreditation via Chat
Another equally common and manual approach is collecting information through the broadcast chat.
In this case, attendees leave their information, such as name and email, directly in the chat.
This method isn’t very recommended, though. It can lead to a flood of messages and make it harder to check the information sent.
Online Accreditation with Even3
To solve organizers’ main pain points, Even3 created two ways to handle online accreditation: automatic and manual.
In automatic mode, attendees are checked in by the platform automatically when they access the event’s online broadcast.
In manual mode, the organizer enables check-in whenever they choose during the broadcast.
Then, attendees click a button themselves to confirm their attendance.
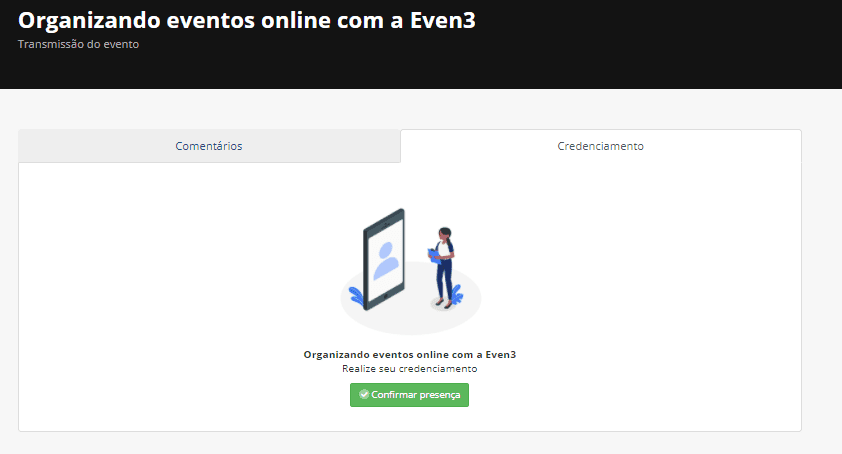
How about using this feature at your event? See how it works in practice.